Woodland Embossing Folder
The Woodlands Embossing Folder is retiring and only available while supplies last at my online shop. I suggest getting it soon, as it will probably sell out.
I used this popular folder for many projects for this fall and winter. Here is a technique involving stamping directly onto the folder that everyone is trying. It gives you a 3D look with stamped images behind the dry embossed birch trees.

Today’s Tips:
-First, ink up your folder on the debossed side – the inside of the plastic that has the logo. Here I used Crumb Cake, on the next card I used Pool Party. Then stamp again with the pine tree stamp from Wonderland in Mossy Meadow ink several times, taking care not to slide the stamp since the Crumb Cake ink will still be wet.
-Lay your Whisper White panel on the uninked side of the folder, fold together so it doesn’t shift, run through the Big Shot (back and forth to get good coverage)
The debossed background will be colored, along with the pine trees while the birch trees remain white.
-Come back in with a marker if you want the cracks in the birch tree to be a different color than your background.
-Try other colors and other stamps directly on the folder. I have seen cars and animals with this technique.
-Try this variation, to get a moon (or sun) into the picture.
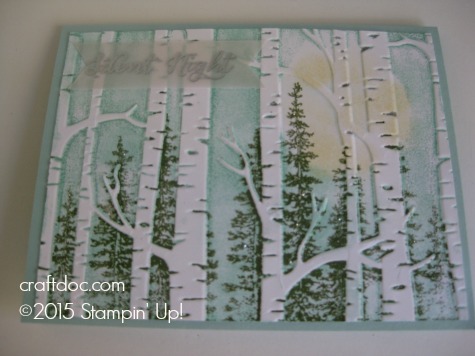
-Place a round mask (punch out of post it note) on the Whisper White Cardstock panel.
-Ink up the folder as above with Pool Party ink. Run through the big shot. Remove the mask and sponge with So Saffron Ink.
-Wash and dry the folder and now stamp it with the pine tree. Be sure the tallest tree is in the space where the sun will be. Line up the panel at the exact same spot as before (look for the branches) and run it through the Big Shot. You must do the inking of the folder in 2 steps, or else the mask will block off the taller trees.
-I added some tiny dots of Dazzling Details on the trees to give them a sparkle and added a silver embossed on vellum banner.
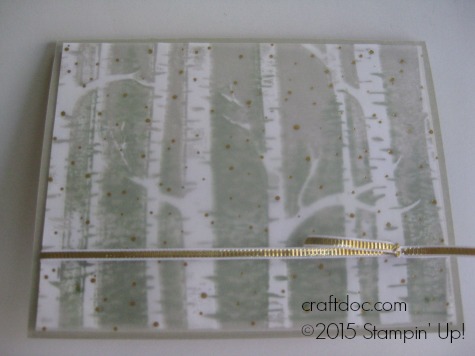
This technique takes some trial and error, so don’t give up too soon. Any less than perfect panels can be covered over with vellum for a nice, soft look. Here I used the vellum stack from the Holiday catalog and added some gold ribbon. All supplies are Stampin’ Up and can be purchased at my online shop. I hope you enjoy trying this fun technique! Check out my facebook page for more projects.
No Comments »
No comments yet.
RSS feed for comments on this post.
Leave a comment
Line and paragraph breaks automatic, e-mail address never displayed, HTML allowed: <a href="" title=""> <abbr title=""> <acronym title=""> <b> <blockquote cite=""> <cite> <code> <del datetime=""> <em> <i> <q cite=""> <s> <strike> <strong>